Pastel leopard print nails...
I have been a fan of experimenting with nail art for a while now and leopard print is one of my favourite designs because it looks really intricate but is actually really easy to do. So I thought I would show you a step by step guide to how I accomplish this look.
I chose to do a pastel theme for my leopard print seeing as we are coming into Spring and pastels will be huge. The great thing about this design is that you can change the colours around to match an outfit or to create a number of different looks. Leopard print has got a bit of a rep for being trashy (Kat Slater?) but I love it and if it's worn in the right way I think it can look awesome. By choosing these pastel shades this leopard print looks very feminine and pretty.
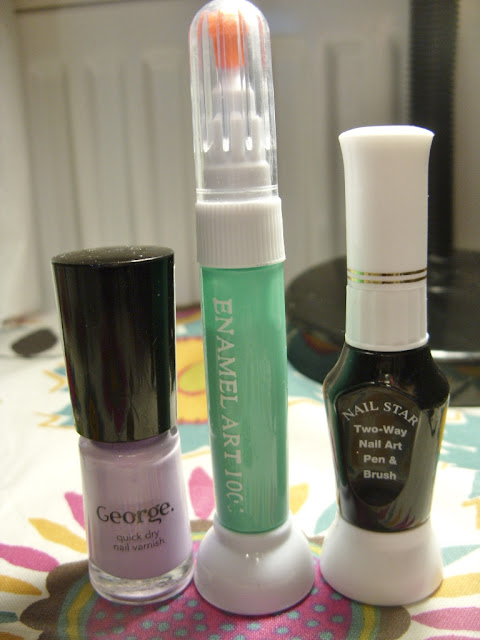
These are the products that I used to create this design, they were all very inexpensive but still give a great finish nonetheless. The lilac nail varnish is from the George range at Asda the colour is 'be mine' (aw Love Hearts:)) and was about £2. The aqua two way nail art pen has a pen with a nib and a brush (the brush is quite thick so not great for any intricate lines...I shall show you in bit) and was part of a set that I got from Ebay. The set was around £6 for 12 or so pens so rather cheap price-wise:) And the black two way nail art pen is similar to the other one just in different packaging, except the striping brush is much thinner, and this was part of my nail art kit for my Beauty Therapy course but I'm sure you can find similar ones on the internet.
1.
Ok first you want to start by prepping you nails by filing them into your desired shape (mine are squoval). While you are filing you want to make sure that you don't 'saw' at your nails as this may damage them. Instead you want to file them using a smooth motion only going in one direction at a time. Next give your nails a little bit of a buff to smooth out your nail (buffing also stimulates the blood flow to your nail making them healthier so is an important step). If your cuticles are looking a little bit worse for wear then rub some cuticle oil or cream into them and push them back gently. Apply a base coat to your nails to prevent any staining and also a base coat helps the nail varnish last longer.
Now I couldn't find my base coat (boo I always loose things!) so instead I used one coat of a sheer nude varnish- Ciate Paint Pot in My Fair Lady. Let your base coat dry completely.
Oh and please excuse my wonky fingers!
2.
Next you want to apply your lilac nail varnish (or whatever colour you want to be the background of your design). I only applied one coat as the varnish I used is pretty opaque and any streaks can be covered up with the leopard spots so you don't have to worry if it doesn't look perfect (yay time saver!). Leave this to dry completely.
3.
With the aqua nail art pen, using the brush end, paint blobby (sorry I can't think how else to describe it) marks randomly on the nail. Make sure that the marks aren't too symmetrical, they can be different sizes but not too big as you want at least 3 on each nail. Once again these don't have to be super neat because any messy bits can be neatened up with the black outline. Let this dry.
4.
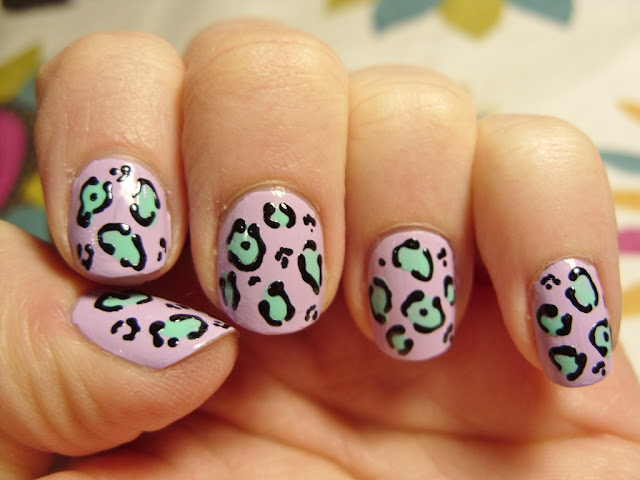
Using the pen end of the black nail art pen (if you haven't used one before all you have to do is squeeze the bottle gently and the nail varnish will come out the nib and then you can draw your design) outline the aqua splodges with blobby, uneven semi-circles and curved lines. You may find it easier if you have a picture of leopard print to copy for this step so that you make it as authentic as you can. The fact that the nail varnish comes out of the nib unevenly (well it does with mine) seems to make it easier to get the look that I like.
I did previously try this pastel leopard print design but chose to do the outline colour white instead of black because I thought it would look softer against the lighter colours but for whatever reason it just didn't look right. So I would advise that you use a dark colour for the outline colour, even if you're not doing a pastel look, as it just defines the leopard pattern better. Generally when choosing the colours your are using the background should be the lightest, the splodges a medium colour and the outline a dark one.
5.
Now this step isn't obligatory as you may be happy with your design how it is but i tend to add a few little marks and dots in the outline colour to fill in any gaps that I may have. Now let you nails dry completely then apply a topcoat to make your nails lovely and shiny and ensure the design lasts. Aaaaaaand.....
......TA DAH!! Here are your pastel leopard print nails:)
Hope you found this helpful :)


No comments:
Post a Comment