Tuesday 25 June 2013

Some recent purchases

It was my birthday just over a week ago and seeing as I'm older I tend to mostly get money as a gift from my relatives so that meant I went shopping! :) The following items were bought between a few different shopping trips and I have actually ordered a few things online but they are yet to arrive.

These first items were actually bought before my birthday and are all from Matalan. Now I don't normally shop in Matalan but I had been searching everywhere for a half decent bikini that was flattering and in my size (an almost impossible task to accomplish if you don't wish to pay £50 or something silly) and happened to have a little peek on the off chance they had something I liked. They had a surprisingly lovely range of swimwear and this pink snake skin print bikini caught my eye and when I saw the tiny price I knew I had to get it there and then. The bikini tops have proper bra sizes which I liked as it guaranteed that it would fit well. 
After buying the bikini I received a voucher for £5 off when I spent £25 which I thought was pretty good so I had a little browse on their website and decided upon these two pairs of sandals. The wedge sandals were bought to wear with my birthday outfit (should have a post up on that soon) and are actually more of an off-white colour in person but I still like them. The only negative point is that the sizing come up a little big but the ankle straps are adjustable so that is easily sorted by tightening the straps so my feet aren't flapping around.
I haven't worn the black sandals yet but I know once the weather is a little less wet they will be perfect for pairing with most outfits because of the colour and minimal style is so easy to wear.


These next two items were actually birthday gifts but I thought I would share them with you as they are fashion related and I love them. 
These purple Hunter wellies will be perfect as I live in the countryside and like to go on walks where it can get  muddy (although I would prefer not to get my Hunters dirty!) also if in the future (looks pretty distant right now) I go to any festivals I'm sorted :)
These black and white Harlequin leggings were from Republic in their sale, I saw them  when I was with my boyfriend and was like 'I need these!' and he kindly offered to buy them as part of my birthday present. You most likely can't see  from this photo that the leggings are sort of a velvet texture which reminded me of the ones they have in  Topshop at the  moment. They are fairly highwaisted which is perfect as I love how flattering this style looks.  I am planning to wear these with anything from crop tops to slouchy jumpers as I think they are a piece that can easily be dressed up for a night out or dressed down during the day.

Top-£5
 Statement necklace-£3
Set of 3 necklaces-£2
Next these items were from Primark which was actually a bit of a disappointing trip if I'm honest as there really didn't seem to be anything of interest. I did however pick up this multi coloured top with a cut out in the back and buttons down the front. I liked the colourful and busy print and thought it would look good tucked into some shorts or jeans. It is a bit of an awkward length though; shorter than your average top but too long to be a crop top which is a bit annoying so I'm considering shortening it.
I bought these necklaces as I liked the ethnic feel they had and that they were silver as I have been wearing a lot of gold jewelry recently and fancied a bit of a change.
Bralet-£3 (special offer)
Crop top-£4 (sale item)
Crop top-£6 (sale item)

These items are from New Look and are from the recent sale. I don't know what it is lately but whenever I go shopping I don't want to buy any of their new season stock and end up rummaging in the sale racks. It's not because I don't like the new clothes I just don't end up buying any of it. 
The black bralet I bought to wear underneath a sheer top I bought in H&M (it's coming don't worry) and I'm sure I will find many uses for it apart from that. 
I really like the print on the black Aztec print crop top and ended up buying it although it is a size too big, I have tried it on and although it's a bit loose I thing it looks OK and just gives a more relaxed feel to outfits.
When I saw this white crop top I was intrigued by its texture which I think will add a bit of interest to an outfit even though colourwise it is plain. The sleeves are longer than on other crop tops I've seen as the neckline comes off the shoulder a bit.
 Tiger top-£5 (sale item)
 Top-£3 (sale item)
Skulls vest-£5 (sale item)
Once again I only found things in the sale. These were from H&M, which had a really good sale section as there was a lot of stock in lots of different sizes so it was easy to find what I wanted.
This sheer top with the tiger on it really interested me as I keep seeing tops with cats on them. I will wear it with black jeans or leggings with that black bralet underneath for day or tucked into a midi skirt for nights out.
I thought this nude coloured top would be great for a really casual, understated look if you wore it with skinny jeans, a statement necklace and some boots or sandals.
I'm not 100% sure about the shape of this vest as it is a bit big on me and doesn't hang well but I really do like the print so I will probably just wear it tucked into highwaisted skirts and trousers.
Crop top-£4.99 (sale item)
Yes it's another crop top! And it was in the sale surprise, surprise! This was from Quiz and was £10 off the original price which I think is pretty darn good! In real life it is actually a bit more neon than pastel and is so soft so I know it will be super comfy to wear. I plan to wear this with my harlequin leggings as I think the colour and boxy shape will work really well with them.
As I seem to have bought a lot of tops I thought i should get some more highwaisted trousers (soo much more comfortable than low rise) and was considering some more Topshop ones but as more places are doing their versions of  the American Apparel 'Easy Jeans' I thought I would give the ASOS Ridley jean a go. These are a dark blue acid wash (although it's not clear in the picture) which I thought would be a a nice change from the plain jeans I have. They are a really nice fit and suck you in without being uncomfortable but they are no where near as soft and stretchy as the Topshop Joni jeans. 

Thanks everyone :)

Friday 21 June 2013

REVIEW: L'oreal Skin Perfection 3 in 1 Purifying Micellar Solution.


So, I finished my first bottle of L'oreal's micellar solution so I thought I would tell you what I thought as I was pretty impressed. I'm sure you have heard of the 'original' micellar water, Bioderma, and basically this is just a cheaper version of that. First I must tell you that, shock horror! I haven't used Bioderma so I cannot compare the two products and actually this is the first micellar water I have tried so I guess I am doing a bit of a first impression on the whole micellar water hype (although as always I am pretty late on that wagon as per usual!)

While I was using this micellar solution I didn't change any other products I use on my face so I would be sure that any changes that may have occurred to my skin would have been caused by this product. Also I used this product until I had finished the bottle, which was over two months, to give it a real chance to do its magic as sometimes skin care can take up to six weeks to make a difference.

First I guess I should give you a bit of a summary of my skin; to describe it in one word I would say it is temperamental. I have combination skin which seems to vary quite drastically from being being very oily and spot prone to the drier side of normal. Although I am prone to spots they are not particularly horrendous, just bothersome, my real problem are those pesky little under the skin bumps and black heads. To top all that lovely stuff off I also have sensitive skin (I have had reactions to products aimed at sensitive skin on two occasions) which means I am prone to redness.

As I wear makeup pretty much every day I want to make sure it all comes off (and out of) my skin at the end of the day but this is where I have had problems trying to find the right products for my skin. When I have tried cleansers that claim to reduce oil they just made my skin dry. When I tried products for dry skin they make my skin greasy. Products aimed for normal or sensitive skin subsequently didn't seem to have any effect. Ever since I have been wearing makeup, which is around nine years (well that's made me feel old!) I have been trying all sorts of  skin care products and it was only a year a go that I stopped using wipes and realised that I needed to take my makeup off and then cleanse, tone etc. So far I think I have found a good cleanser and toner (albeit not the Holy Grail I'm afraid) and the thing that was frustrating me was makeup remover....
Until now!!


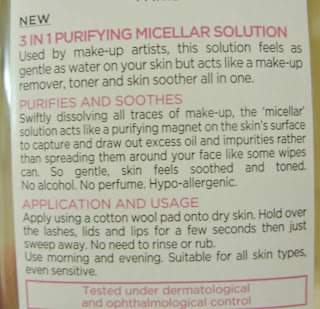
OK this is the back of the packaging with all their claims, promises and what not. The first claim made that the solution is as 'gentle as water' I can really vouch for as I did get some it in my eye (clever I know) and I can say, hand on heart, it did not hurt or sting anymore than getting water in your eye would. 

The fact that this product claims to be suitable for face, eyes and lips did seem a little unconvincing at first because seeing as the pH of these parts of skin can be vastly different (the skin around the eyes is alkaline whereas the rest of the face is acidic) means that realistically they cannot be treated as one. However L'oreal's micellar solution seems to do just this; it didn't dry out or irritate around my eyes and balanced out my skin as well as cleaning it deep down.

I used this micellar solution as my first step of my night time skin regime. I applied it to two cotton pads (one for each eye) and pressed it over my eye lightly. Now on the packaging it says you only need to press it on the area for a few seconds but when you're wearing at least five coats of mascara you would have to be delusional to think a few seconds would do anything so I would hold it on for anywhere up to a minute and then gently sweep it across my eye. Now this would take off a fair amount of my eye makeup but not all of it so I would just turn the cotton pad over and repeat to remove the remainder. For my face I would apply the solution to two more cotton pads and sweep them over my face until all my makeup was off and then I would proceed to cleanse my face.

So although not all the claims have been entirely proved I'm sure L'oreal would tell me that it's because I didn't use the micellar solution along with the other products in the Skin Perfection range (which I am keen to try). All this said I was so impressed with the way that this product was able to help me remove my makeup almost effortlessly. There weren't any crazy changes to my skin but what I have noticed is that in the few weeks since I stopped using L'oreal's micellar solution there have been noticeable changes to my skin. I am instead just using my lotion cleanser to remove my face makeup and a normal eye makeup remover to take off my eye makeup and then cleansing again and with this regime I feel that afterwards my eyes are a little drier and my skin has been more oily. Also now I'm not using the micellar solution I don't get that fresh clean feeling after removing my makeup.

I shall definately be repurchasing this lovely product (the only reason I haven't is that I wanted to see if my skin was different without it) which brings me to my next point which is the price. If you fancied giving Bioderma a go it would set you back around £16 as well as a bit of a mission to find it as I don't think its sold in the UK yet. However L'oreal's micellar solution is only £4.99 and you can get it at Superdrug, what's not to love about that then? 
Now check out this list of ingredients! Yes I know I can't pronounce all those words but...sorry was just counting, there are only seven ingredients! Seven ingredients, wow! I don't think I have ever seen something that I have bought in Superdrug that has so little ingredients. Now as I have said I haven't used Bioderma or any other micellar waters so they may have less ingredients but when you are comparing it to ingredients of other makeup removers and the like it is definitely a winner. This is something I don't feel guilty about putting on my face :)

So tell me, have you used a micellar water? What did you think?

Thanks everyone :)


Monday 29 April 2013

Beatles in the woods

Lovely morning spent feeding ducks and their little ducklings (aww!!) in the woods near me. I was sad that it wasn't quite warm enough to get my (slightly) tanned legs out but at least I have put away my winter coat, hopefully, for the next couple of months :)


Sunglasses- Primark £2
Scarf- Market stall £4
Cardigan- Generation@ New Look £8 (in the sale)
Beatles Tshirt- H&M £7.99
Bracelets- Primark £1.50 for 2
Skirt- Generation@ New Look £11.99
Plimsoles- Primark £6

I love the Beatles as they were a band my mum  listened to frequently when I was growing up, so they always bring back fond memories. I mostly associate their songs with warmer weather so I thought it would be appropriate to dig out this Tshirt and wear it with my new denim skater skirt.  Although it was sunny today the wind was pretty chilly I had to put on some tights, but hey only one pair,  a scarf and cardigan. I'm obsessed with the way the bottle green of this cardigan and the deep red and orange of the scarf look together, it just looks so right. In fact these two items are staples in my wardrobe and I pair them with anything even if it clashes!

Thanks everyone :)


Saturday 20 April 2013

Get them toes out!

Yay! My feet have finally come out from hibernation and I wore my first sandals of the year!! Rather excited if I'm honest because I just love open-toed shoes :) Although there has been other warm days where sandals were a possible footwear option I haven't been able to as I can't have my feet exposed at college due to health and safety...blah blah...
These pink jelly sandals I bought last year from Primark and I do believe they were only about £2-3. I was wearing a monochrome outfit so thought these would add a bit of colour. Bright pink, giant bows and plastic charms? So tacky right! Oh well I think they are one of my more 'fun' pieces I own which add a bit character and playfulness that seems appropriate as soon as the sun shows it's face.
Obviously I had to make sure my toes were looking their best so I gave them a bit of a pedicure and painted them in the Essie shade Brazilliant which totally clashes with these shoes but hopefully in a good way!
Aww don't you love flowers for no reason? :) Brightening up my window a treat! Especially seeing as the plant to the left isn't growing!

Hope you enjoyed the sun! 


Thursday 18 April 2013

About time too...

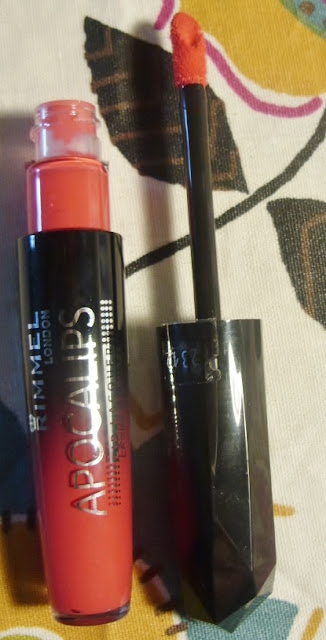
Yes I have finally purchased a Rimmel Apocalips! I first heard of them before they were even released when Dolly Bowbow reviewed them on her Youtube channel (see the full video here). She had all the shades they carry and I pretty much loved them all, hence why it took me so long to buy one...ah decisions, decisions.
For those of you that aren't familiar with Apocalips they are basically a lip lacquer; somewhere between a gloss and a lipstick. They come in gloss-like packaging and formulation, but they have the super pigmentation and staying power of a lipstick.
The colour I finally decided upon was Stellar. This was the one that knew I was most likely to end up with although I did consider Lunar and Nova as well (future purchases no doubt). Stellar is rather bright and is somewhere between red, coral and pink and seems to look like a different colour in different lights so I can't make up my mind what the colour really is....but I know I love it :)
Soo what do I think.....
I have worn this 3 times now and can safely say that this is my favourite lip product that I have tried to date. The formula is just perfect, it is really long lasting but in no way dries out your lips. When it does eventually begin to fade (hey nothing lasts forever) it doesn't got go patchy but instead looks like a lip stain and gets lighter...I would say until it disappears but I haven't worn it long enough for that to happen and I've worn it all day!
When you apply it to your lips I would recommend that you scrape any excess product off  the applicator first instead it can look a bit too glossy. Apart from making sure you don't have any flaky skin on you lips (a necessity anyway, right?) you don't really have to prep your lips as Apocalips is lovely and moisturising. Also you don't need to line your lips as it doesn't feather (mind you I have only tried one shade but it is a pretty bright one that you would think would feather.)
One amazing product I say and it won't break the bank as it retails for £5.99 but seems to be discounted in a  few places, I got mine for £5 in Asda :)
My current nails.  Clouds on the thumb and alternating daisies and polka dots.

Thanks everyone :)


Friday 12 April 2013

Nails of Pinterest

When I get a free second I love to peruse the Hair and Beauty category on Pinterest for a little bit of inspiration and the other day I came across this image:
There's nothing I don't like about this nail design, who doesn't love a bit of tribal pattern? I also like that this is perfect for this season what with the bright colours but also the fact that you could swap up the colours to anything you want.
Seeing as I liked these nails I thought  would give them a go and show you how I did them :)
This is what I did! Obviously I have changed the design slightly, it is a bit simplified but the main reason I have done this is because I have really quite small nails so wouldn't have been able to cram as much detail on mine as there is on the original! Maybe if I had done the black stripe a little wider? Oh well there's always next time :) Also the base colour is more of a 'sunshine' yellow as opposed to a neon yellow with a tinge of green. This was because it was the only bright yellow I have in my nail varnish collection (something I shall amend soon enough I am sure).
1.
So with any nail design you want to start by prepping your nails. File your nails into shape using a nail file, just make sure it isn't too coarse as this could damage your nails. Also you want to file your nails in one direction at a time and not 'saw' at them as this can also damage them.
 Next you want to do some cuticle work; how much you do will depend on the condition of your cuticles. Massaging an oil or cream into the skin around your nails will help to soften them making them easier to push back. If your cuticles are slightly overgrown then you can also use a cuticle remover product (these can be a gel, liquid or a cream) which will dissolve any dead skin making it easier to remove from the nail.
If your nails are maybe looking a bit dull, or perhaps they tend to peel, then buffing them with a multi-sided buffer will be beneficial.
Apply a base coat to your prepped nails to make a smooth surface for the nail varnish to stick to and prevent any staining.
2.
For my base colour I used an NYC nail varnish in Lexington Yellow. This is a lovely primary yellow and cost under £2. As it was a cheaper brand of nail varnish I did have to apply three coats to get an opaque finish (two coats looked a bit streaky). Make sure the nail varnish is completely dry before moving on to the next step.
3.
With a two-way black nail art pen (I used the thin brush end), or you can just use a striping brush and any black nail varnish, I painted thick-ish stripes vertically down my nails. The thickness of the stripes will depend on how wide your nails are, and remember you need to leave a bit of space either side to do some dotting. I alternated whether the stripes were central or to one side to mix it up. On the original picture there are horizontal stripes at the tips but at the moment my nails are slightly rounded at the tips so I didn't think this would look as good but would look fine if you have square nails.
4.
The stripes don't really have to be dry to do this step so that's a bit of a time saver :)
Using nail art pens, or a dotting tool and coloured nail varnish, I created a row of dots either side of the black stripe. The colours I used were a pastel pink, pastel turquoise and a bright coral which I alternated down the row of dots. Now if your dots are larger than mine then you could always add a smaller dot of black or white inside it, but just make sure the first dot is 100% dry first.
5.
Make sure the black stripe is completely dry before doing this step.
Using a white nail art pen I painted zig-zags down the black stripe. As my white isn't very opaque I drew these fairly slowly letting the colour flow out the pen to create a thicker, more opaque line. This is just the way I prefer to do it but you could just as easily give the zig-zags two coats instead.
6.
Now using the white nail art pen again add dots between the zigs and zags (if you catch my drift!). Once again if you have room for larger dots than I have done then you can always add a smaller dot of colour in the middle of the white dots.
Once everything is totally dry (so as not to smudge your work) apply a generous amount of topcoat to prolong the design and add a beautiful shine :)


Hope you enjoyed this tutorial :)